Details View – Problem Properties & Custom Answer Spaces
Problem-Attic’s Arrange tab now has a “Details view” where you can assign an objective to a problem, change its formatting, convert multiple-choice to free-response, and add a custom answer space.
Please note: The Details view replaces the override button, or gear icon, that was in previous versions of Problem-Attic.
If you are most interested in custom answer spaces, you can scroll down this page and look at the examples, including:
- “griddables” (also known as grid-ins)
- coordinate graphs and numberlines
- snippets of graph paper
- blank lines for writing prompts
- grids, boxes, and empty space for student work
3-minute lesson
In case you didn’t know, about 70% of the multiple-choice questions in Problem-Attic can be automatically converted to free-response. This option pairs nicely with custom answer spaces. To see them together, please try the following.
-
Log in to Problem-Attic and start a new document.
-
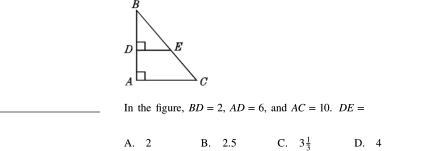
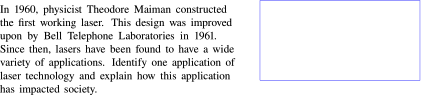
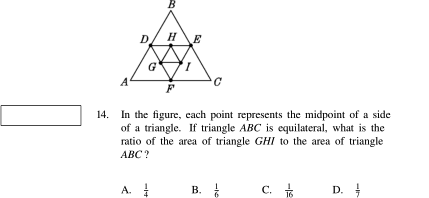
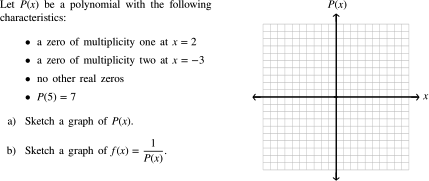
Select at least one multiple-choice question that can be converted to free-response. For this lesson, we recommend that it have a numerical answer. An example is below.
-
Click Arrange.
-
In Grid or List view, click the thumbnail for your ‘convertible’ question, or click its number in the tree.
-
Click Details.
-
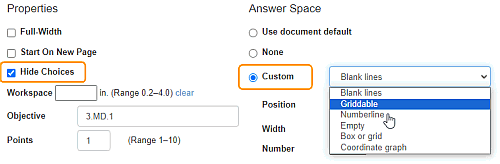
Put a checkmark next to the option, “Hide Choices”.
-
For the answer space, drop down the Custom menu and choose “Griddable”.
There are 26 griddable styles for state assessments, the SAT, AP Biology, and other standardized tests. Choose an appropriate style for your grade and subject. For Position, choose “Right” or “Below”, whichever you prefer.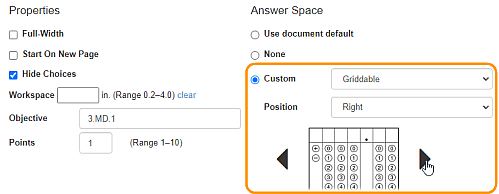
-
Click Make PDF. Your question should appear as free-response with a griddable answer space.
More about the Details View
On the Arrange page, you can switch between Grid, List and Details view as often as you like. Each has advantages. Grid view is designed for moving problems, because the small-sized thumbnails can be dragged easily to a new position. List view is good for scrolling through your problems at full size and removing any you don’t want (or, if you are a subscriber, editing or duplicating). Details view is where you set an objective, change formatting options for a particular problem, or add a custom answer space.
Please note that Details view is different for problems and parts. If you click on a problem number in the tree, or if you click a thumbnail in Grid or List view, then Details shows problem properties and answer space options. If you click on a part in the tree, then you will see an option for adding directions.
Here are a few things you should know about problem properties and answer spaces.
- Objective Use this field to assign a short coded objective to a problem, such as "Math AF.4B" or "Std 7.3-a". (The field is not intended for long, written-out objectives.) The objective will appear on the answer key and will be used for various export and scoring options.
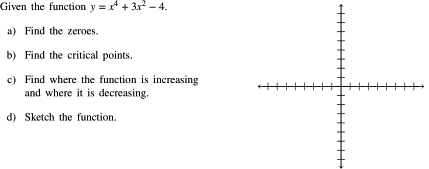
- Full-Width This option is for a two-column test or worksheet. It forces a problem to go across a page. It is useful when a problem contains a large table or graphic and you don’t want it scaled down to fit, or when there are four or five large multiple-choice answers. The Full-Width option was used for the sample document above. You can see how it created a T-like layout on the PDF.
- Start on New Page This option is for tests and worksheets only. Use it to force a page break before the currently selected problem. Note: if your goal is to reduce the number of problems on a page, you can go to the Format tab and use the “Problems per page” option instead of manually forcing page breaks.
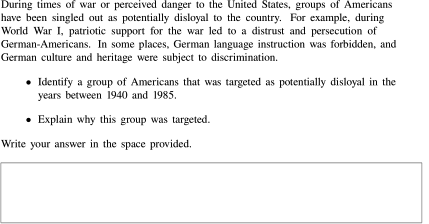
- Hide Choices Select this option if you want to convert a multiple-choice question to free-response. Problem-Attic does this by hiding choices. Very important: not all questions are convertible. Consider, for example, the wording, “Which of the following...” If choices are necessary, then the question is flagged in the database and the hiding option is ignored.
- Workspace Use this option to increase or decrease the amount of space below the currently selected problem. Basically, this overrides whatever workspace value is set at the document level (Format tab > Template). Please note that the value is relevant only on a test or worksheet and only if workspace is actually turned.
- Answer spaces Use these options to override the document-wide settings, or to add/change an answer space for a particular problem. The “None” option suppresses the answer space, say for an essay-type question or task. It will have a visible effect only if you’ve selected a document template that includes answer spaces. To understand all of the options for “Custom”, please see the examples below.
Note: the answer space options apply to all PDF documents, tests and worksheets, overheads, flash cards, etc. Custom answer spaces will not appear on slideshows, online tests, or quizzes which are exported for an LMS. Also, on a PDF document, if you create a custom answer space that is too large for the available space, Problem-Attic will try to make it fit, possibly by adjusting the width or position.
Answer Space Examples
In the 3-minute lesson above, we introduced griddables. The other types of answer spaces are blank lines, box or grid, coordinate graph, numberline, and empty. What follows are examples of each, along with details about size, position and allowed values.
Blank lines
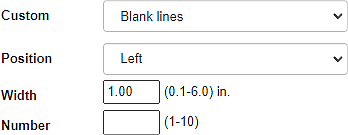
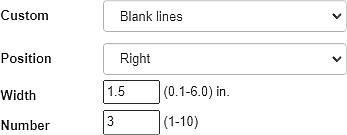

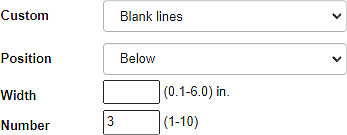

Notes about blank lines: If you don’t specify a number, you’ll get a single blank line. If you don’t specify a width, you’ll get about 1.5 inches on the right or left, or when below, the full width of the problem.
Box or grid
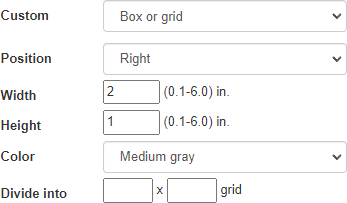
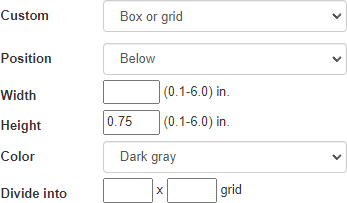
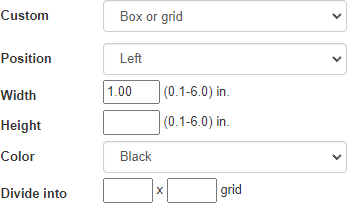
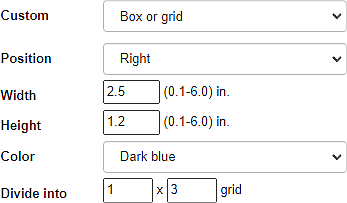

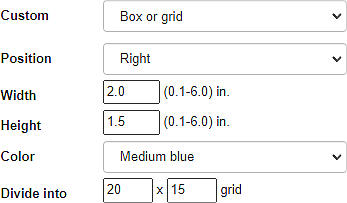
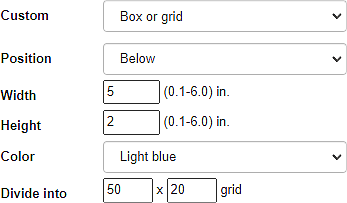

Notes about boxes and grids: If you don’t specify a width or height, you’ll get about 1.5 inches and 0.3 inches respectively. For graph paper, you’ll probably want to divide the grid into square units. Otherwise, you can create table-like grids with arbitrary numbers of columns and rows.
Coordinate graph
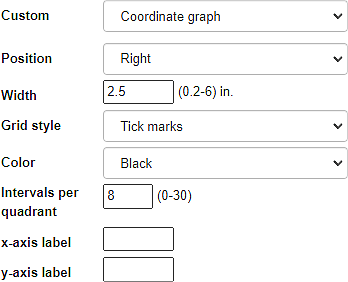
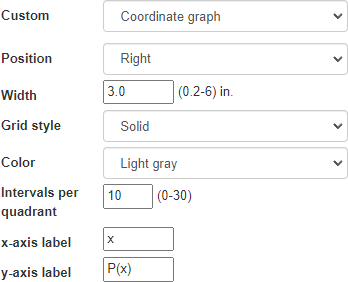
Notes about coordinate graphs: The graphs are always square with the same height and width and equal number of intervals per quadrant. If you don’t specify a width, you’ll get about 1.5 inches. Labels are meant to be short (maximum 5 characters) and are always formatted in math mode (with italicized letters). The color option is ignored for tickmarks.
Numberline
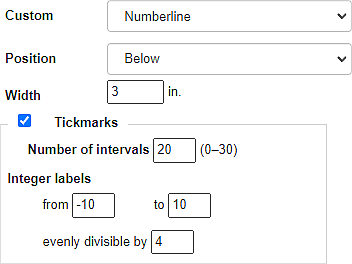

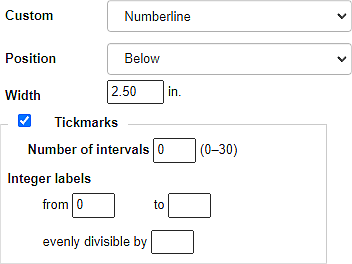

Notes about numberlines: If you don’t specify a width, you’ll get about 1.5 inches. Zero intervals will produce a single tickmark in the middle, which will get labeled with the starting integer (if any). The allowed integer range is −9999 to 9999. The value for “evenly divisible” is like a skip rate for labels. The value must work with both the number of intervals and the integer range.
Empty
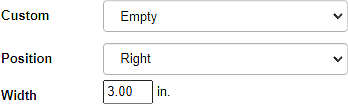
Notes about “empty”: This is a good option if you want to reserve space next to a problem. The space can be used for students to show their work or write an answer. If you don’t specify a width, it will default to about 1.5 inches. An empty answer space should normally be positioned on the right. If you position it on the left, it will effectively push over a problem. If you would like space below a problem, you should use the workspace option instead, because you can control the height.
As always, we appreciate your feedback about new features. Please let us know how you like the answer space options or how we can make them better. Definitely let us know if we missed a grid-in answer type for your state, and we’ll add it. You can write to us at support@problem-attic.com.