Parts, Directions, Formatting of Individual Problems
Problem-Attic documents are now “hierarchical”, which means you can separate them into parts and subparts, add your own directions, and change the formatting of individual problems. You can also insert custom answer spaces, such as:
- “griddables” (also known as grid-ins)
- coordinate graphs and numberlines
- snippets of graph paper
- blank lines for writing prompts
- grids, boxes, and empty space for student work
The answer spaces are very useful for hands-on tasks, and they pair nicely with Problem-Attic’s automatic conversion from multiple-choice to free-response.
You will see all these new options in two places: on the Arrange and Format tabs. The options are easy to understand and use. If you’re already familiar with Problem-Attic, they don’t require you to do anything different when creating a document. Still, we encourage you to read the information below so that you’re aware of the new direction-handling and formatting capabilities. If you’re most interested in the answer space options, you’ll find a quick lesson and lot of examples here.
Important:
-
The gear icon for Problem Properties has been eliminated. But all of the options are still in Problem-Attic. To see them, click a thumbnail in Grid or List view (Arrange tab), or click a problem number in the new “document tree”, then click the new Details button.
-
Problem Properties used to be a subscriber option, but now they’re available to everyone. Please take a look. You’ll be amazed at how much control you have over the formatting of individual problems without having to edit them.
Arrange tab
The Arrange tab has been redesigned to include a “document tree” on the left. It also has a new button called Details, and buttons for adding and removing parts.
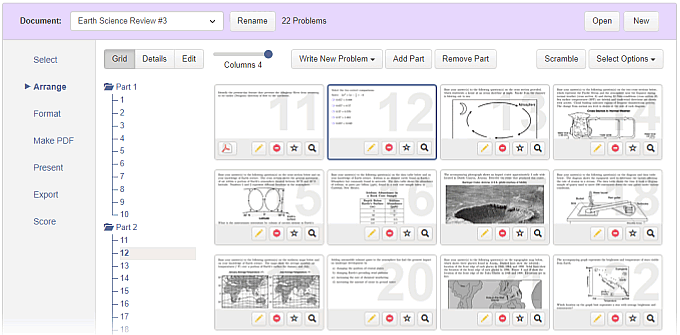
The tree shows the structure of your document. By default, a document has just one part, and all problems that you select go into it. As before, you can move problems around in Grid or List view. And now you can do the same with the document tree: simply click on a problem number and drag it to a new location.
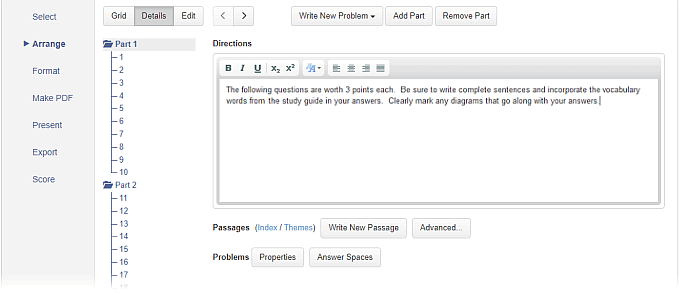
The Details button shows different information for parts and problems. If you click on a part in the document tree, you’ll see a field for adding directions. If you click on a problem, you’ll see an objective field and various options for formatting the problem and inserting a custom answer space. Please scroll down for more information about these options, or for answer space examples, please click here.
Format tab
On the Format tab there is a new panel called “Numbers, Parts and Labels”. This where you go to control the formatting of part and problem labels and directions. There are options for numbering, as well. You can start a document at a specific problem number, or, if your document is divided into parts, you can restart the problem numbering for each. Below are more details about the format options.

Adding/Removing parts
Every Problem-Attic document must have at least one part. To add more, click the Add New Part button near the top of the Arrange tab. To remove a part and optionally delete its problems, click the Remove Part button.
You can create parts inside of parts. This is called “nesting”. There is no limit on the number of parts that a document can contain; however, there is a limit of three levels for nested parts.
Important: You cannot mix parts and problems at the same level. That is, a part can contain subparts or problems, but not both. This rule has two implications:
-
If your document has multiple parts, some drag-and-drop operations may not be allowed in the document tree. For example, if a part already contains problems, you will have to remove them before you can put another part inside of it.
-
When you click the Add New Part or Remove Part button, certain options may not be available, depending on how your document is structured. Also, to complete an operation, it may be necessary for Problem-Attic to move problems to a different part.
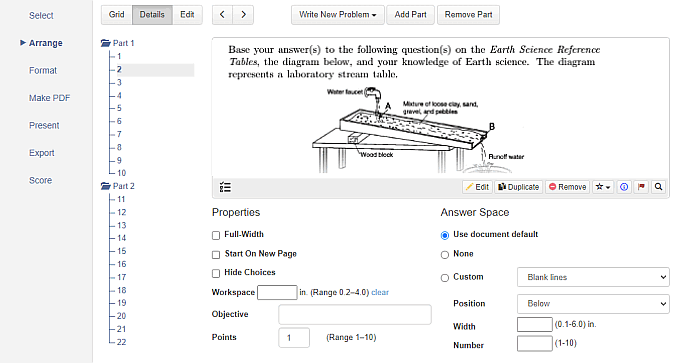
Problem Details
Here is more information about the options you’ll see when you select a problem on the Arrange tab and click the Details button.
-
Objective Use this field to assign an objective to a problem, or to override the current objective. What you type will be shown on the answer key and Score tab (Problem view). It may also be used for certain export operations. The field is intended for a short coded objective, such as “Bio 4.5A”.
-
Full Width If your document is formatted as a two-column test or worksheet, you can use this option to force a problem to go across the page, or temporarily change the layout to one column. This option is intended for large problems which don’t look good in columns or which have pictures or tables which should not be resized to fit. The option may have the effect of creating a T-like layout, or inverted T, on one page of your document.
-
Start on New Page Select this option to insert a page break before the currently-selected problem. Note: if your goal is to reduce the number of problems on a page, you can go to the Format tab and use the “Problems per page” option instead of manually forcing page breaks. Also, be aware that when you force a page break, you are doing it for a problem, not a position. If you move the problem, the page break will go with it.
-
Hide choices Select this option if you want to convert a multiple-choice problem to free-response. Problem-Attic does the conversion by hiding choices. If you would like to convert as many problems as possible to free-response, then you can save a lot of time by not doing on the Arrange tab. Instead, use the “document-wide” option on the Format tab (Multiple-Choice panel).
Very important: not all problems are convertible. Some problems are flagged in the Problem-Attic database to disallow hiding. This is done when a problem needs its choices to make sense, e.g., when it is worded like, “Which of the following...”
-
Workspace Use this option to increase or decrease the amount of space below the currently-selected problem. You can type a value from 0.2 to 4.0 (inches), or click “Clear” to use the default value for the document. Please note that workspace is relevant only to tests and worksheets, not other types of documents.
Very important: If you don’t see any workspace below problems, make sure that you’ve selected the option, “Include Workspace”, on the Format tab (on the panel called Document template). When you type a value for an individual problem, you are not actually turning on workspace. Instead, you are overriding the value which is set at the document level.
Custom answer spaces
Use this option to add an answer space to a problem. In the drop-down menu, you will see many types of answer spaces, including blank lines and boxes, coordinate systems, and what are often called grid-ins or griddables.
Answer spaces appear on the PDFs you make in Problem-Attic: tests and worksheets, flash cards, etc. They are ignored when you create a slideshow or an online test, or export a quiz to an LMS.
If you choose the option, “Use Document Default”, then you will get whatever answer space is specified on the Format tab (on the panel called Document Template). If you want a problem to have no answer space, choose “None”. This will effectively suppress whatever option has been set at the document level.
For more details about answer spaces and lots of examples, please click here.
Format Options
The Format tab has a new panel called “Numbers, Parts and Labels”. Here are details about the options.
-
Starting problem number Normally a document starts with problem number 1. If you would like the current document to be the continuation of another, then you can type a different starting number in the box.
-
Restart problem numbering for each part Normally a document has continuous problem numbering, even when divided into parts. Click this option if you want problem numbering to restart at 1 within each part.
-
Start each part on a new page Select this option to insert a page break between parts. You can also insert a page break before a specific problem (see above). Note: a page break won’t occur before the first part of document or the first subpart, if nested.
-
Put border around directions Select this option to highlight directions by putting a border around them.
-
Use bold font for directions Select this option if you want directions to be formatted with a bold font.
-
Part and Problem Labels Use the drop-down menus to choose a label style for parts and problems, or choose “None” if you don’t want labels. Note: if you have nested parts in your document, the label style will be applied to all of them. (There is no way, at present, to choose a different label style for subparts.)
-
Use Bold Font This option is available for part and problem labels. Select the option if you would like the label to be formatted with a bold font.