My Documents
On the Select tab in Problem-Attic you’ll see a button called My Documents. It’s your gateway to merging, splitting and re-using problems from documents you’ve already made.
To be clear, My Documents is not where you go to re-open a document in Problem-Attic. That’s done with the drop-down menu at the top-left, with the Open button at the top-right, or by clicking Organize at the top of the page. If you want to browse through your documents and select questions from them, then click My Documents.

Besides merging and splitting (see step-by-step instructions below), My Documents can help you:
- revise the materials you’ve already made, instead of starting from scratch
- create review worksheets by pulling questions from prior tests, quizzes, or homework
- search for questions you’ve already used, or questions you’ve written or edited.
My Documents can be used just like a question bank. After clicking the button, you drill down, browse the questions, and select what you like. The navigation panel and all selection shortcuts are the same. The main difference is the hierarchy: it comes from the titles of your documents and, optionally, the folders that you create on the Organize page. Basically, My Documents is a special kind of bank which is modeled after the work you’ve done in Problem-Attic.
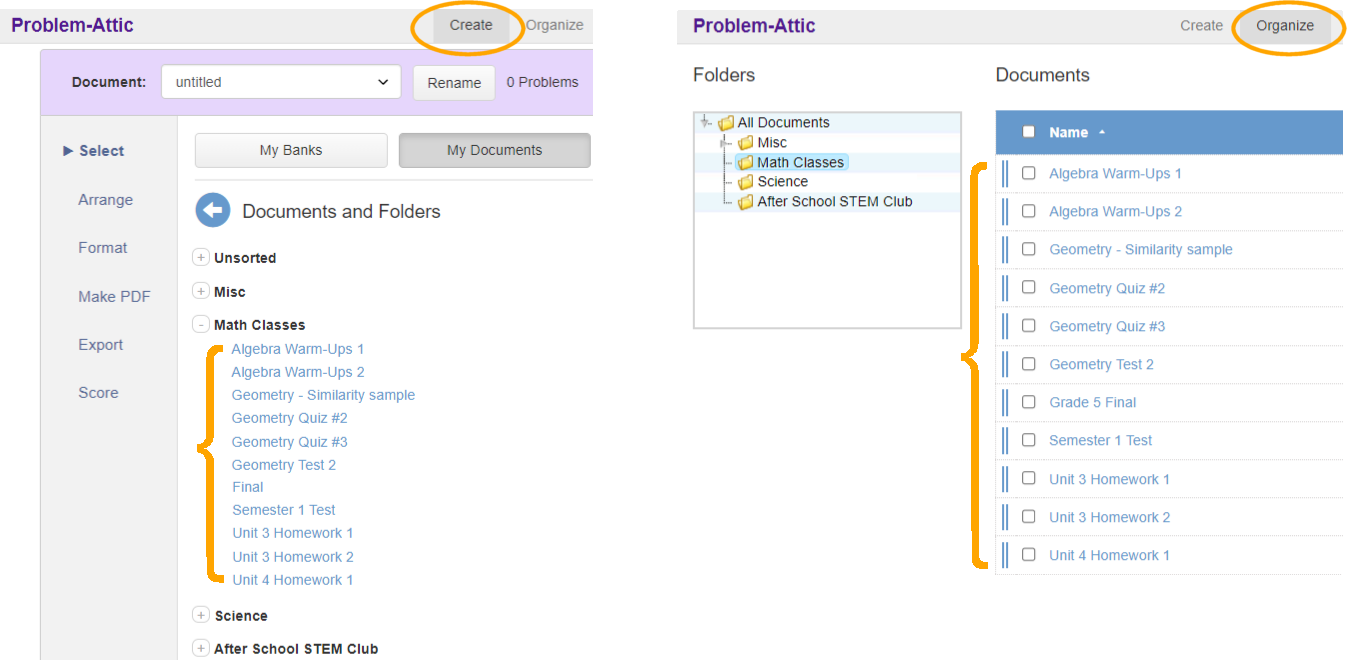
The figures below will help you understand the relationship between My Documents and the Organize page. If you create folders and move documents into them, then you’ll see the same hierarchical structure in My Documents (left figure) as you do on the Organize page. (right figure). Any documents which are not in a folder are considered unsorted. You’ll see “Unsorted” as the first expandable container in My Documents.
The folder system is entirely optional in Problem-Attic, but we recommend it to anyone who’s created more than a few dozen documents. Instead of viewing documents in a flat list, they can be moved into folders with descriptive names. Also, the folder system can be up to five levels deep (with folders inside of folders) so you can create just about any hierarchical structure you like. A simple hierarchy might be the types of documents you’ve created: tests, quizzes, homework, warmups, exit tickets, etc. A more complex hierarchy could represent state standards, teaching units, or textbook chapters. We discuss this further in relation to Problem-Attic’s curriculum development tools.
More Details
Here are more things to know about My Documents:
-
When you drill down into My Documents and add a question, it will go into the document which is currently open in Problem-Attic. You can think of this as the destination document; its title is at the top of the page. As always, the thumbnail slides out of the way. This is a visual effect only. The question is copied, and the source document remains intact.
-
My Documents is a live bank, not static. It grows as you create documents, and it reflects any changes you make to document titles or folder names. Also, if you move things around on the Organize page, or re-open an older document and make changes to it, and you return to My Documents, you will see your changes there. If you wish to preserve a particular organizational structure, what we refer to as a “snapshot” of your folders and documents, you can use the Bank Builder.
-
My Documents matches the folder/document hierarchy on the Organize Page. In case you didn’t know, you can sort the list of documents on that page. To do that, click one of the column headers, such as Name or Last Saved. To re-order documents manually, perhaps to match curriculum standards, you can use the Reorder button. More information is here.
-
When you are in My Documents and viewing problem thumbnails, the Filter button is slightly different than on other selection pages. Instead of the option to mark/hide previously-used problems, you’ll seen an option to mark/hide those which you’ve edited. Keep in mind that all problems in My Documents are previously used.
Example: Merging Documents
One of the most common uses of My Documents is to do a merge, or pull questions from several documents into one. We’ll use an end-of-year review as an example. Imagine you’d like to make a review worksheet which has some of your favorite questions from previous chapter tests. Here are the steps to follow:
-
Start a new document in Problem-Attic. This will be your review worksheet. Name it whatever you like.
-
Click the Select tab, then click My Documents.
-
Find your chapter tests. If they’re in a folder, expand it to see the titles.
-
Click the link for one of the chapter tests. Browse the questions, and add what you like to your review worksheet. (The review worksheet is the currently open document.)
Tip: you can use the large Add button at the top to select questions randomly. Or, for random selection, you can use Problem-Attic’s right-click option when looking at document titles. More information is here.
-
Switch tests and select more questions. To switch, you can go up a level and click on a different title, or you can use the Navigation panel to move through your documents. More information is here.
Repeat steps 4 and 5 until your review worksheet has all the questions you like. Keep in mind that you can over-select. It’s easy to cut down the number questions on the Arrange tab.
Two last notes:
-
When you are in My Documents and looking at problem thumbnails, you’ll notice a Move button, which doesn’t appear on regular select pages. This is literally a way to move a problem from a document you made previously to the currently-open document. If you’re developing curriculum, there may be a good reason for doing that. Normally, though, you’ll want to use the Add button, which keeps the previous document intact.
-
My Documents can be used in a similar way to split a document. However, if you want to re-use nearly all of it, then we recommend a different splitting method. You should start with a copy of the document, then delete the questions you don’t want. That’s done with the New button near the top of the screen. (When you click New, you’ll see an option to start with a copy of a document.)