Building, Sharing & Managing Frameworks
Problem-Attic has tools for aligning questions to state standards, for doing curriculum development for your school or district, and for adapting the database to meet your own personal needs.
One of the tools which is available to all Problem-Attic users is called the Framework Builder. A framework is like a custom database module. You can select questions from it just like you do with the modules built into Problem-Attic. Also, it can have a hierarchical structure, so it can be designed around learning objectives, a scope-and-sequence, textbook chapters, etc.
A framework is easy to create and share, because it makes use of methods you’re probably familiar with already: adding problems to documents and organizing documents into folders. We won’t be covering those topics here, but you can learn about them through online help. When we go through the steps of building, sharing & managing frameworks, we’ll assume that you have made at least a few documents and you know how to switch between the Create and Organize pages in Problem-Attic.
Notes:
-
The Framework Builder does not require you to put documents in folders, but it works best if you do. Folders are the secret to the hierarchical structure. Without them, your framework will be a flat list of document titles.
-
You do not need a subscription to create or share a framework. In fact, you can make your framework available to other Problem-Attic users just by providing them with a link. If you do have a subscription, the Framework Builder gives you an option to share with other teachers at your school. You can also do district-wide sharing, if there is more than one subscribing school.
-
You should think of a framework as a “snapshot” of certain folders, documents, and problems. If any Problem-Attic users have installed the framework, it will not change, even if you delete problems or move around documents. However, you can update the framework at any time and then give other Problem-Attic users a new link. Also, you can turn off sharing, which prevents future installs.
-
There are other tools for curriculum development called My Database and Document Sharing. Unlike a framework, which is a one-time snapshot, a link to a document will reflect any changes you make to it, so it may be considered a “live” link. See this page to learn more about the curriculum development tools and how they differ from one another.

The Framework Builder
Here are the steps for creating and sharing a framework.
-
Go the Organize page in Problem-Attic.
-
If you have organized your documents into folders, right-click the one you would like to turn into a framework. All folders and documents inside of it will be included.
If you have not organized documents into folders, right-click the folder at the top, which is called “All Documents”.
-
Choose Framework Builder from the pop-up menu.
-
In the Framework Builder dialog, the title will match the folder that you clicked. You can change the title if you like, but it must be be less than 30 characters long.
-
Choose who the framework will be shared with.
-
Individuals Problem-Attic will give you a link for sharing. Anyone who has the link can install the framework into their account. Please note: building a framework for individuals will automatically install the framework into your account as well.
-
School The framework will be pushed to the accounts of all authorized users at your school. (This option requires a subscription.)
-
District The framework will be pushed to the accounts of all authorized users at your school and other schools in your district. (This option is available if other schools also have a subscription.)
-
-
Click Continue. The framework will now be built and installed into your account. If you chose Individuals, you’ll be given a link that you can share. With that link, they can install the same framework into their accounts.
Note: links can be posted on a school or district website. This is an alternative to building the framework for the school or district. (When the latter is done, the framework gets installed automatically.) You may also share a link publicly. If you do, please read the information below about subscribing and non-subscribing schools and what will be accessible to other teachers.
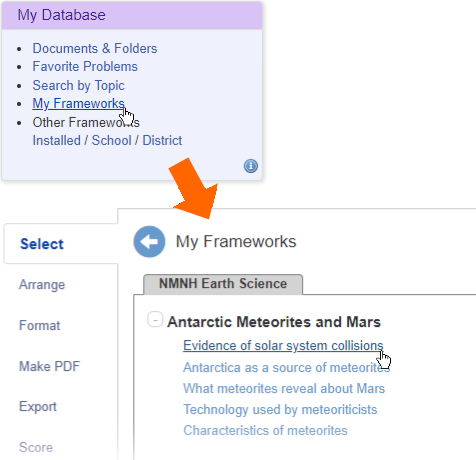
To view a framework that you’ve built, go to the Create page, and click the Select tab once or twice until you’re at the top level (with the nine panels). Under My Database (bottom-middle panel), click the link called “My Frameworks”. You can drill down into yours and select questions just as you would from any other part of the database.
Framework Manager, Details About Sharing
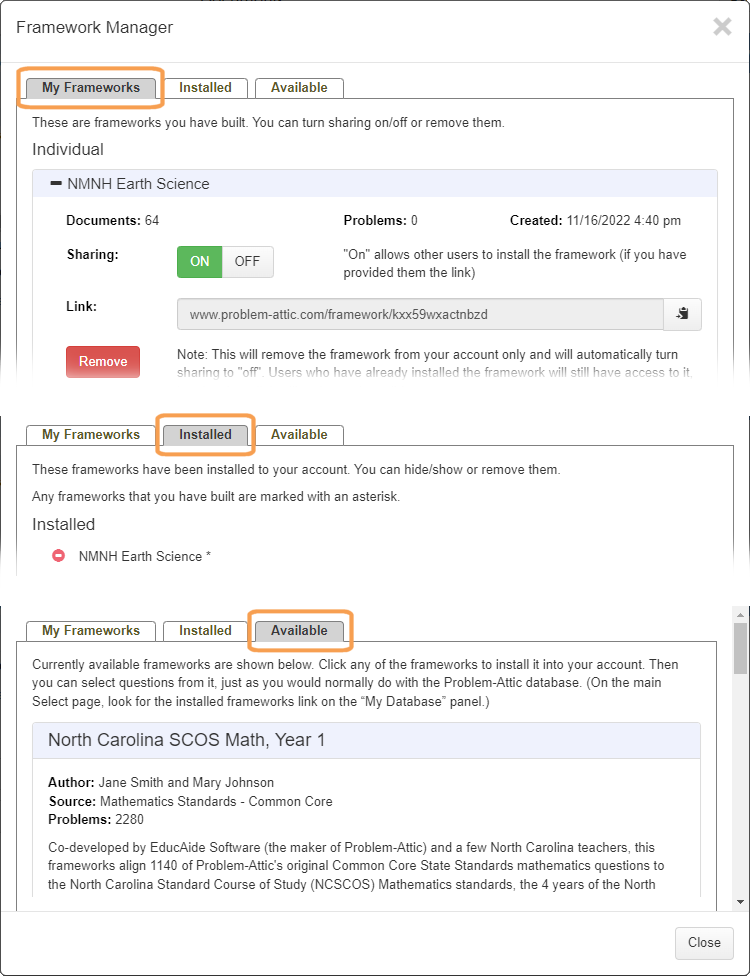
After you’ve created a framework, you can change who it is shared with, or remove it entirely from “My Database”. To do that, return to the Organize page and click the Framework Manager button.
In the Framework Manager dialog, there are three tabs.
-
My Frameworks This tab shows the frameworks you have built, which includes individual, school and district frameworks. You can expand a framework panel, copy the link (if built for individuals), turn sharing on/off, or remove it from your account.
-
Installed This tab shows all the frameworks that have been installed into your account. Any frameworks that you have built are marked with an asterisk, and you can hide/show them by clicking the eye icon, or remove them by clicking the remove icon.
-
Available This tab shows all of the available frameworks that you can install. It’s similar to the Custom Banks page.
Problem-Attic lets you create up to five individual frameworks, and one each for a school or district.
Important: a framework may any include any questions from the database, including those which require a school subscription. However, if they require a subscription, then they won’t be accessible to a teacher at a non-subscribing school. Therefore, as a courtesy and to prevent confusion, you should include in your framework only questions which are available to everyone, or limit sharing of the link to Problem-Attic users who are similarly-licensed.
How to Include Objectives
If you are aligning questions with state standards, then you will almost certainly want to include objectives in your framework. These are the short codes, like “Math AF.4B” or “Std 7.3-a”, which show up on thumbnails, on answer keys, and on the Score tab > Problem view.
Before we explain how to include objectives in frameworks, we should tell you how they get attached to problems. There are three ways:
-
On the Properties tab in the Editor. When you type an objective here, it is physically attached to a problem. It will be the default when the problem is selected for a new document, and it will travel with the problem through a shared document or framework.
-
On the Arrange tab > Problem Details. When you type an objective here, it is treated as an override. It is attached to the problem for one particular document. If you share the document (through a public link), the objective will follow, but it will not be included in a framework.
-
On Select pages, when problems are organized by standard. You can think of this attachment as virtual, because problems inherit an objective from their parent container. This happens when the standard is written in a certain way, with a code inside square brackets. For example:
[5.04A] Identify prime and composite numbers.
When you select a problem from the container, the code inside the square brackets automatically becomes the objective on the Arrange tab > Problem Details.
As we noted above, a framework is a custom database module, and it works just like those built into Problem-Attic. That means, when you create a framework, you can take advantage of method #3. We strongly recommend it. The physical attachment of objectives in method #1 is time-consuming, because you have to edit every problem, and ultimately it is less flexible. With the virtual method, you can assign new objectives to problems simply by moving them from one document to another or by changing a single code at the document level.
If want to include objectives in your framework using the virtual method, then your work will mostly center around the naming of documents. Here is what you need to know:
-
Document names should match up with the standards. But they don’t have to be the full written-out standards. In fact, we recommend you abbreviate them and emphasize just a few key words. If document names are short, then there will be no line wrapping and it will be easier for users to scroll through them on the Select pages in Problem-Attic.
-
Documents are the parent containers from which problems inherit their objectives. Also, they are the lowest-level containers in a hierarchical structure. Folders are the higher-level containers. Objectives do not get inherited from folders, so you can give them any names you like. (But keep the names short, just as we recommend for documents.)
-
The document name is what shows up in the drop-down menu at the top of the Create page, and in the list of documents on the Organize page. This may be different from the title of a document. The title is what actually appears on a test or worksheet, or at the beginning of an online test; it is what students see. By default, the title is the document name, but you can change that on the Format or Export tab.
-
If you put a code in square brackets at the beginning of a document name, then, when you run the Framework Builder, that code becomes the objective for the problems. Notably, this happens when problems are selected from the framework; nothing actually changes in your document. Also, it doesn’t matter if problems have different objectives attached to them through the editor or on the Arrange tab. You do not need to remove them. In effect, the framework that you build is a re-alignment. Its objectives become the new defaults.
-
If you like the virtual method of attaching objectives, but you don’t want your documents to be named with square-bracketed codes, there is an alternative. Problem-Attic can add them to your document names as part of the framework-building process. But you will need to tell the program what objective goes with each document. This is done with the three-dot Properties button on the Organize page (rightmost column in the list of documents). At the top of the Properties dialog is a field where you can enter a short coded objective. Whatever you type there will have the same effect as if it were part of the document name.
Note: in the Properties dialog, there is no need for square brackets. You can type just the coded objective. Also, if you type an objective there and in square brackets in the document name, the latter takes precedence.