Support for interactive questions, editor changes.
Problem Attic now supports various kinds of interactive questions for its own online tests. These are also known as “Technology Enhanced Items” or TEIs. The supported types are drag-and-drop, ordering, clickable boxes, and dropdown menus.
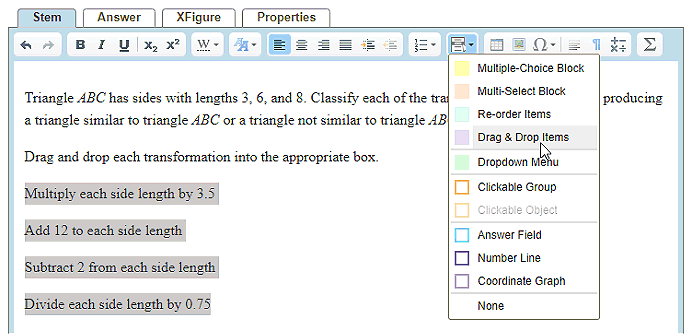
Support for interactive questions has led to a few changes in Problem-Attic’s editor. One of the most important changes is in the editor toolbar: a new menu called “Answer types”. The icon and dropdown menu are shown here:
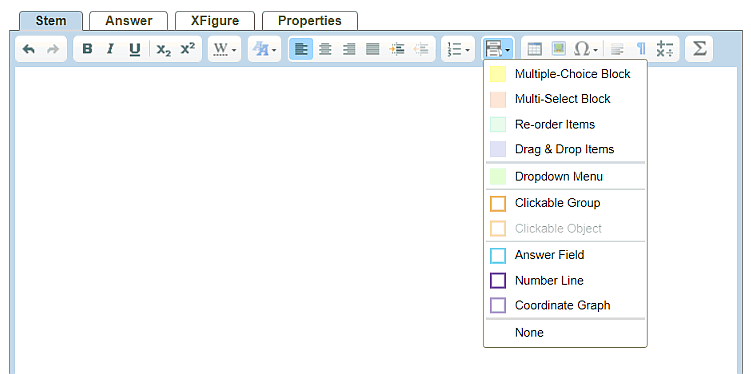
If you’ve used Problem-Attic’s editor to write or modify questions, then you’ll notice Multiple-Choice Block and Multi-Select Block have been moved to the Answer types menu. (Previously, they were in the Lists menu.) Also, if you create a table and open the Properties dialog, you’ll see a new tab called Interactive. This tab is used in conjunction with the Answer types menu to create a drag-and-drop question.
The best introduction to interactive questions is this 3½-minute video.
We recommend that you watch the video, if you haven’t already, then return to this page for more information. We think you’ll find Problem-Attic’s handling of interactive questions to be simple and intuitive. But there are a few nuances, or technical details, which are important, especially if you’ve worked with interactive questions in another program.
Note: you need a Problem-Attic subscription to do online testing or to edit questions. To learn more, please click Plans in the main menu (top of the screen) and select Overview. If your school doesn’t have a subscription, you can try all the options in the Play Area.
A few things to keep in mind
So there’s no confusion about the question database or what’s changed in Problem-Attic, please make note of the following.
-
None of your existing documents are affected by this update.
-
Questions won’t be interactive or “live” if you export them to an LMS. Instead, they’ll show up as free-response, same as before. Because there are many different ways of representing and scoring interactive questions, it will still take some time before Problem-Attic can reliably convert them to a QTI or other format.
-
Draggable items can sometimes be difficult to fit in what we call a “dropzone”. This is true for all programs which support drag-and-drop. Our dropzone must be a table or an image. This page details how dropzones in tables are created and used.
-
In Problem-Attic, a question cannot have multiple parts and also be interactive—at least not for automatic scoring. Of course you can write or select questions which have Part A, Part B, etc. But on an online test they will be presented as free-response.
On a positive note, Problem-Attic does something unique with interactive questions: it makes them easy to re-format, so they work just as well for instruction as they do for assessment. We believe, if you’re going to put a lot of effort into writing questions and storing them in a database, then there should be a wide range of options for delivering them to students, from printed documents to slideshows to online tests. We think you’ll see how this plays out with our new editor options and, in particular, what are called “lettered tabs”.
Answer types menu: more details
In the editor, the Answer types menu is designed to make the writing of interactive questions both fast and flexible. Basically, it treats everything like a list. There is no tabbing between fields, and you don’t start by specifying a question type—only to find out later that it’s hard to change. In Problem-Attic, the list approach makes it really easy to go from one question type to another.
For everything except a dropdown menu, you type choices as if they were an ordinary list, just like you would in Google Docs or a word processor. The choices can be words, images, math formulas, or whole paragraphs. After each choice, you press Enter. Then you highlight the list, click the Answer types menu, and select an option, essentially telling Problem-Attic what kind of list you just created.
When you use the Answer types menu, Problem-Attic will apply some styling to your list. It will give each choice a label, and it will put a box around them with a colored background. In the editor, the styling is just a visual reminder of what you created. The actual formatting of the list will be based on other options in Problem-Attic, or how the question is delivered: on a PDF, slideshow, or online test.
If you wish to change the type of question, you simply click in the colored box, go back to the Answer types menu, and select a different option.
As you use the Answer types menu, there are three rules to keep in mind, plus one suggestion:
-
Except for dropdown menus, an interactive question can have only a single list of choices. It’s not possible, for example, to create a question that has a live multi-select block and also a list of draggable items. The editor won’t stop you from trying, but the question will be formatted as non-interactive, or free-response.
-
For a drag-and-drop question, there must be both a list of draggable items and a dropzone. The dropzone is created as a table, as explained below. The list can be above or below the table—the order doesn’t matter—but both must be present for the question to be interactive.
-
For all lists, you can right-click in the colored box and specify an answer or change properties. While the default properties usually work well, there are situations where changing them can improve the appearance or functionality of a question. You’ll find details below about the most important properties, such as lettered tabs, drag limits, and drop positions.
-
You can click the Answer types menu and select an option before you’ve typed any choices. However, because an HTML editor (Problem-Attic’s or any other) makes use of hidden tags, we suggest you type the whole question, including choices, before you apply a list style. That way, you’re less likely to run into a situation where the cursor is next to a hidden tag and the arrow and delete keys aren’t working as expected.
Ordering question
We’re going to illustrate use of the Answer types menu with an ordering question. This is the type of question where students:
-
re-order numbers from least to greatest
-
show the steps of a proof in correct order
-
put historical events in chronological order
-
sequence the events of a story
Here’s what to do:
-
Go to the Arrange tab in Problem-Attic and click Write New Problem.
-
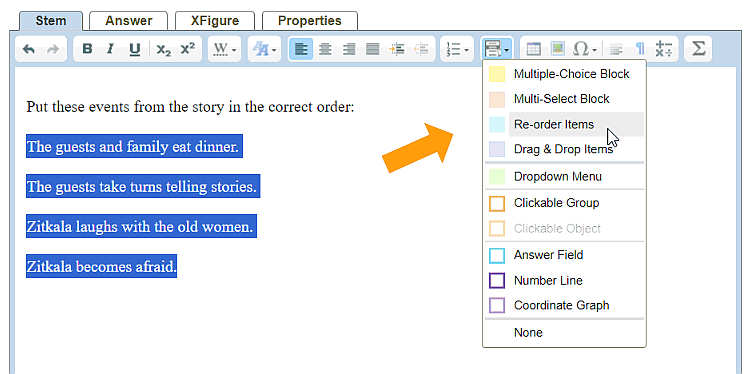
Write the question (sometimes called a “prompt”) and press Enter. Then type the first item in the list, press Enter, and repeat for additional items.
Note: You should type the items in an incorrect order. Problem-Attic won’t scramble them.
-
Highlight the list, click the Answer types menu, and select Re-order Items.
-
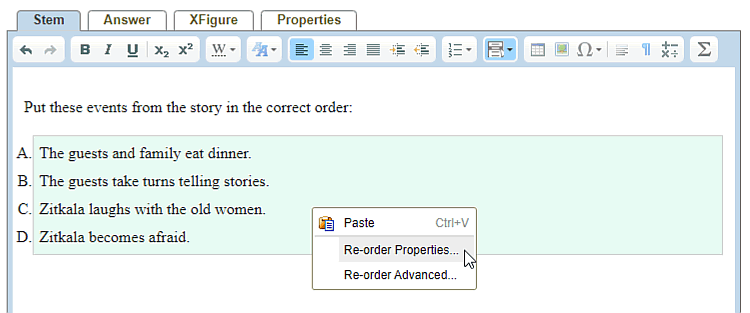
Right-click in the box with your items, and select Re-order Properties from the pop-up menu.
-
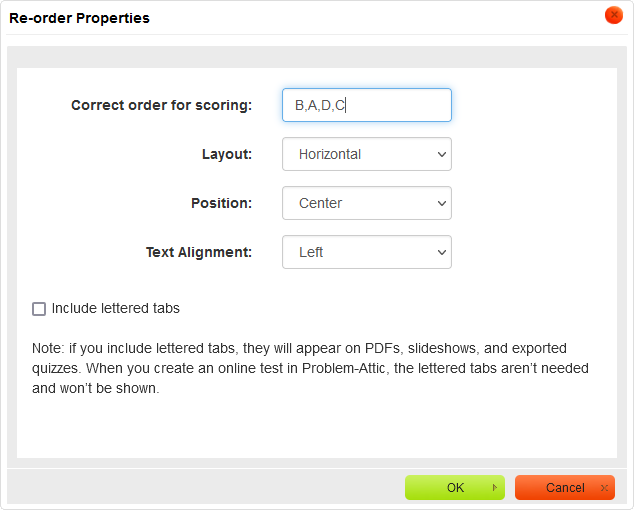
For the answer, type the correct sequence. Use upper- or lowercase letters, and separate them with commas.
-
Click OK in the dialog box.
-
In the editor, click Online Test Preview to see how the ordering question will look and behave in an online test. If you are satisfied, close the Preview, then click Save in the problem editor.
In the Re-order Properties dialog, there are two options which we should explain further.
Layout This option tells Problem-Attic whether you want choices to go across or down the page. The default is horizontal, or across. This is safe, because Problem-Attic will automatically switch to vertical if choices don’t fit. It doesn’t allow items to wrap, and it doesn’t create columns and rows, because that would make the order of items confusing.
Include lettered tabs This option has no effect on an online test, where items are actually moved around. If you select the option, then for all other kinds of output (a thumbnail, PDF, slideshow, Google quiz, or export to an LMS) Problem-Attic will put a small lettered tab next to each choice. The purpose: students can answer the question more easily by writing a sequence of letters, instead of having to re-write the choices.
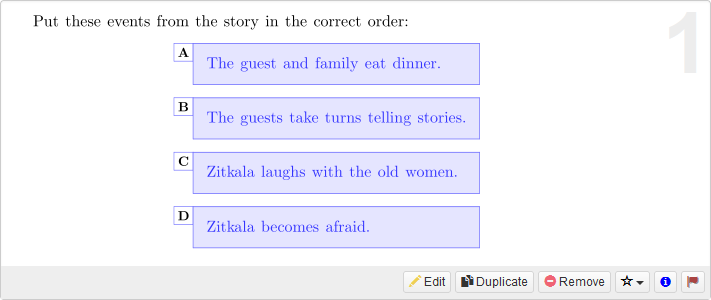
Generally, lettered tabs are not necessary (and can be distracting) for short numeric expressions or single-word choices. For multiple words, sentences, or even images, they can be very helpful, especially for a class discussion.
Multiple-Choice and Multi-Select: Clickable Boxes
Multiple-Choice and Multi-Select questions are written just as they were before in Problem-Attic, techniques are discussed here. and here. There is an important change to their properties, however. You can now turn either type of list into clickable buttons.
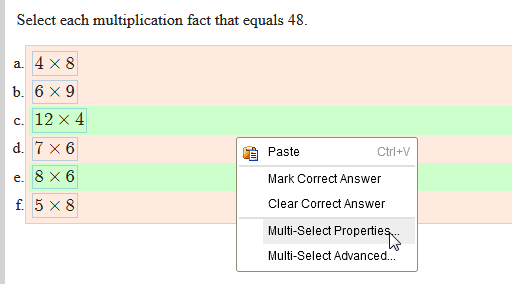
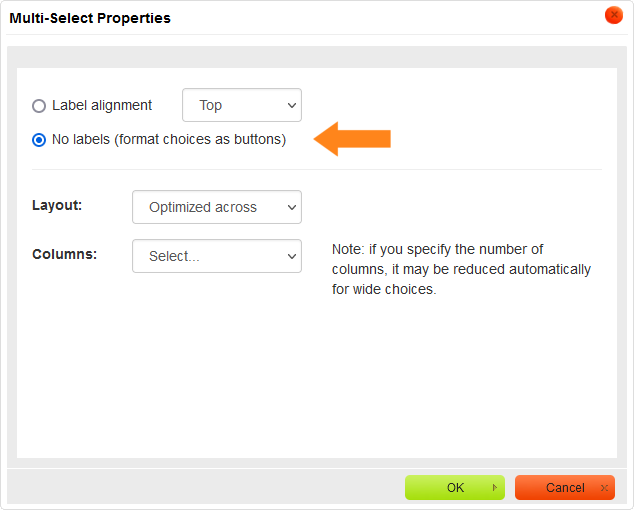
To create buttons, right-click on the list and select Multiple-Choice or Multi-Select Properties from the pop-up menu. Then select the option, “No labels (format choices as buttons).” Click OK in the dialog box, then click Save in the problem editor.
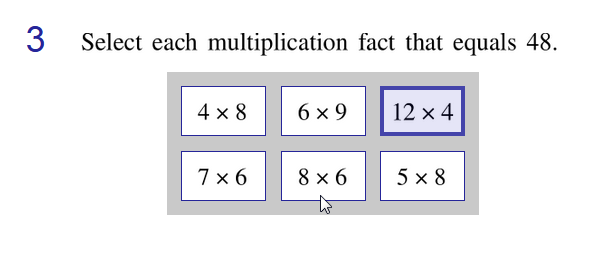
You’ll see the new formatting on the thumbnail and on a PDF. When you click on Online Test Preview or go to the Export page and create a Problem-Attic online test, you’ll also see the buttons there. They are “live” or clickable.
Multiple-Choice and Multi-Select buttons have the same appearance. There is no obvious difference until you click the buttons. With Multiple-Choice, you can select only one answer. (Any other prior answer gets de-selected.) With Multi-Select, of course, you can select more than one answer. (If you click a button a second time, the answer gets de-selected.)
If you are going to turn choices into buttons, there are two options in the Properties dialog box that may be helpful.
Layout The default is “Optimized across”. This means buttons will be put in a row if they fit. If they do not fit, Problem-Attic will try to create an array of columns and rows. If it’s unsuccessful, the layout will be changed automatically to vertical. You can force the buttons to be vertical through the menu.
You’ll also see a Layout option called “Optimized down”. This tells Problem-Attic to go down in the array before going across. There’s no practical difference between across and down unless you’re trying to match the buttons to labeled choices on a PDF or slideshow.
Columns You can specify a number from 1 to 5. The number will make a difference only if it divides equally into the total number of choices (e.g., 3 columns for 6 choices); and the choices will fit in the available space. Since the default layout, “Optimized across”, will create columns as needed, this option is mainly useful if you want to increase/decrease the number or force text to wrap differently.
Dropdown menu
In the Answer types menu, you’ll notice the option called “Dropdown menu” is separated from the others. This is because it is typed into the editor differently. Instead of creating a list of items, you type the contents of a dropdown menu inline. In other words, a menu gets integrated into the text of a question, typically in the middle or end of a sentence.
Another difference with dropdown menus: a question can have more than one. There is no actual limit, but practically speaking, you probably don’t want to include more than three or four menus in a question.
Like a list, a menu is made up of choices. Since you’re typing the menu inline, the way you separate choices is with commas. To specify the answer or correct choice, mark it with an asterisk.
Here is an example of a question with two menus:
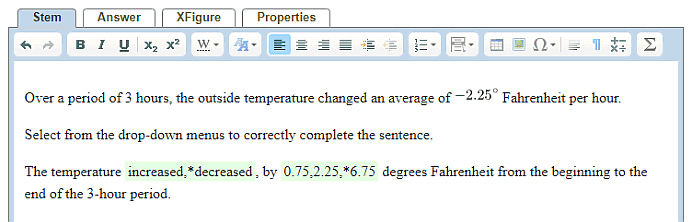
Here is what the question looks like on a PDF and Problem-Attic online test:

We’ve intended dropdown menus to be very simple and easy to add to a question. But there are technical details to be aware of.
-
A menu can have up to eight items, or choices. However, three or four is most common, and a practical limit is five. If there are more choices, the question will not look as good on a PDF or slideshow. (Problem-Attic will show the menu with all choices, causing lines to be spread far apart.)
-
Dropdown menus are not intended for lengthy choices. Generally, each choice should be no more than a few words. If you type very long choices, they will wrap inside the menu. This can make a dropdown menu hard for students to read. You might consider changing the type of question as choices get longer.
-
A menu can have only one correct choice. If you mark more than one with an asterisk, the last one will be considered the answer for scoring purposes.
-
As an alternative to the asterisk, you can right-click on a menu that you’ve created, select Dropdown Properties, and type the answer in the dialog box. If you do that, the answer is a number, where 1=first item, 2=second item, and so on. If you specify an answer in the dialog box and also use an asterisk, the asterisk will take precedence.
-
If a choice happens to contain a comma, put the choice inside of double-quote characters. This is the same technique as used in a CSV file. If it’s the correct choice, type the asterisk before the first double-quote.
-
If a choice is literally a quote, use what are called typesetter or curly quotes, not the double-quote character on your keyboard. Typesetter quotes can be entered from the Insert Specials menu in the editor toolbar, or as unicode characters, or with a keyboard shortcut: double left-quote and double right-quote.
Drag-and-Drop
As mentioned above, a drag-and-drop question needs a list of draggable items and a dropzone, which is a special kind of table. It does not matter which comes first. If either is missing, the question will not actually be “live” or interactive.
The list is created in a similar way as for an ordering question. The only difference is what you select in the Answer types menu: Drag & Drop Items.
Of course, it’s not enough to create draggable items. You need to show where they will be dropped. To do that, you create what we call a “dropzone table”. Here are the steps:
-
Put the cursor on a new line and click the Table icon in the editor toolbar.
-
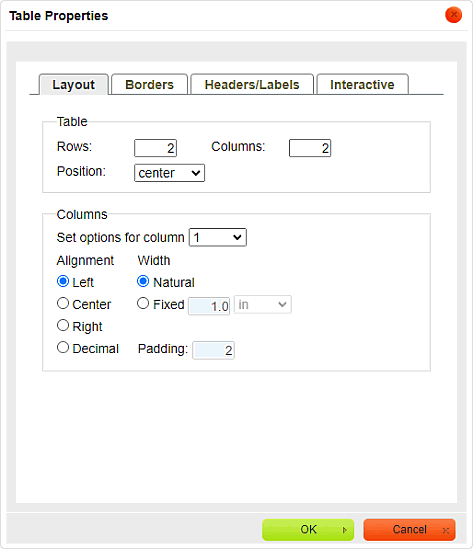
Set the number of columns and rows and, if you like, other options for Layout, Borders, and Header/Labels.
-
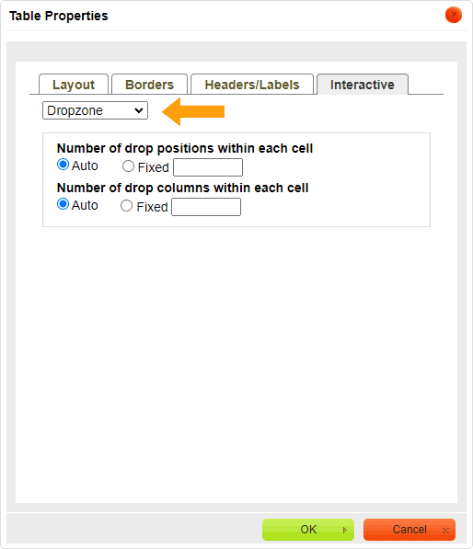
Click the tab called Interactive, and select Dropzone from the list. Further down, we’ll explain the other options that you see.
-
Click OK in the Table Properties dialog box.
-
In the table (usually in the first row or column) type any necessary labels or descriptive information.
-
Tell Problem-Attic where the items are supposed to go. Do this by typing their respective letters in the table. For multiple letters, use a comma to separate them, as shown here:
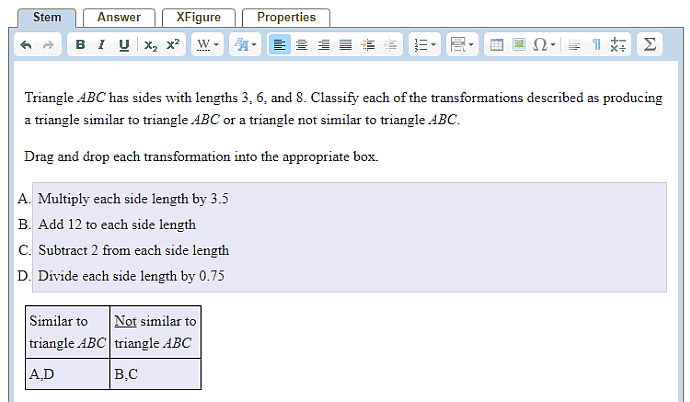
Note: it’s okay to repeat a letter. Likewise, you can skip a letter if not all items are used.
Typing letters in the table is a convenient way of specifying the answer to a drag-and-drop question. That’s all the information Problem-Attic needs for scoring—and don’t worry about the answer being shown in the editor. The letters will be stripped out of the table when Problem-Attic formats it for a PDF or when it appears on a slideshow or online test.
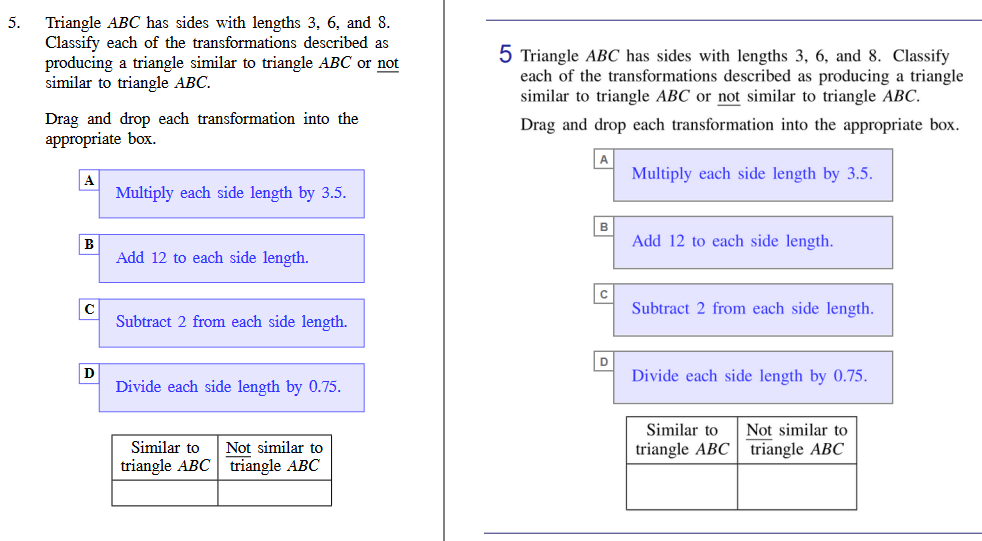
While letters are stripped out of the table, they are used, by default, to label the draggable items. This is true for all forms of output, from a PDF and to an online test, as shown here:
Drag Properties
If you right-click on a list of draggable items, and you select Drag Properties from the pop-up menu, you will see this dialog box:
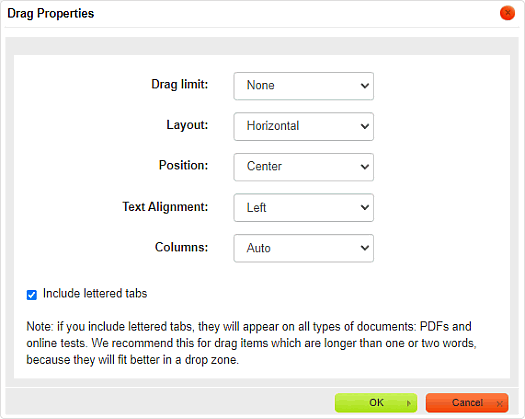
The two most important options are “Drag limit” and “Include lettered tabs”. We’ll explain them in turn.
Drag limit
By default, Problem-Attic allows items to be used an unlimited number of times. With this option, you can set a limit, or the maximum number of times each item can be dragged into the dropzone. Here are some situations where it may be appropriate:
-
Your question implies a limit or has an explicit statement like, “Each item may be used only one time.”
-
Your dropzone table has mutually exclusive labels, such as “True” and “False”, or “Before” and “After”.
-
There is a one-to-one-match between draggable items and cells in your dropzone table.
If you set a limit, then draggable items behave just a little differently on a Problem-Attic online test. After a student uses an item the maximum number of times, it will fade out in its original position. This tells the student that the limit is reached.
Note:
-
If items have lettered tabs, and they are used a maximum number of times, then students will see only the lettered tabs in the dropzone; items themselves will have faded out. To see what a lettered tab represents, students can hover over it with their mouse and the item will temporarily reappear in its original position.
-
Drag limit does not “lock” an item in the dropzone. It is always possible for a student to drag an item from one table cell to another. Also, an item can be taken out of the dropzone. If the limit was reached and an item is taken out, then it reappears in its original position.
Include lettered tabs
The lettered tabs serve several purposes:
-
They help draggable items fit in a dropzone table.
-
They make a question work just about as well in printed form, because students can write letters in the table, simulating drag-and-drop.
-
They make it easier to discuss a drag-and-drop question in class, especially if the draggable items are sentences, images, or complicated formulas.
-
They facilitate manual scoring, or a review of students’ answers.
By default, Problem-Attic will include lettered tabs. They are put on the left of items, as shown above. If you don’t want them, you can deselect the option in the Properties dialog. (Temporary labels are still shown in the editor, and you can use them as a reference, when you type letters in the dropzone table for the answer.)
The following figure shows what a drag-and-drop question looks like on a PDF and online test when lettered tabs are not included. As you can see, when there are no lettered tabs, Problem-Attic will do its best to enlarge the dropzone table so that all items fit. A little further down, we’ll explain some techniques to help them fit.
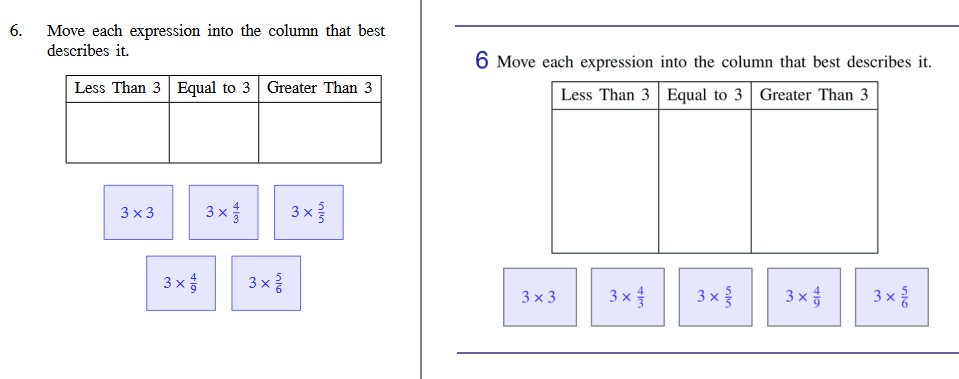
Table Properties
When you create a table and click the Interactive tab, you’ll see options which control the number of draggable items that can go in each cell and how they are arranged. The options affect the table only when it appears on a Problem-Attic online test, i.e., when the drag-and-drop question is actually “live”.
Here is more information about the options.
Number of drop positions within each cell
When this option is set to Auto, the maximum number of items that can be dropped in a cell will equal the number of letters you typed there (for the answer). We call these “drop positions”. For example, if you type "B,D,E" in a particular cell, it will have three drop positions.
Note that drop positions is different from the drag limit. The latter affects how many times an item can be used. The former affects how many items (the same or different) can be dropped into a particular cell. Following up on the previous example, if the drag limit were set to two, then a student could fill up the cell with "B,B,D". There would be no space remaining, or no drop position available, for "E".
For simple drag-and-drop questions, where every item is used or there’s a one-to-one match between items and cells, the default setting of Auto works fine. In other situations, where the number of items that go in each cell varies, or there is an empty cell (no item is supposed to go there), two issues arise:
-
the number of drop positions will give students a hint about where items go,
-
and Problem-Attic won’t create drop positions in empty cells, or create extra positions in other cells.
The solution is to tell Problem-Attic to put a fixed number of drop positions in each cell. The number can equal the total number of items, but that is not usually necessary. There should be plenty of drop positions, and you won’t give away the answer, if the number is one or two more than the maximum number of letters you’ve typed in any of the table cells.
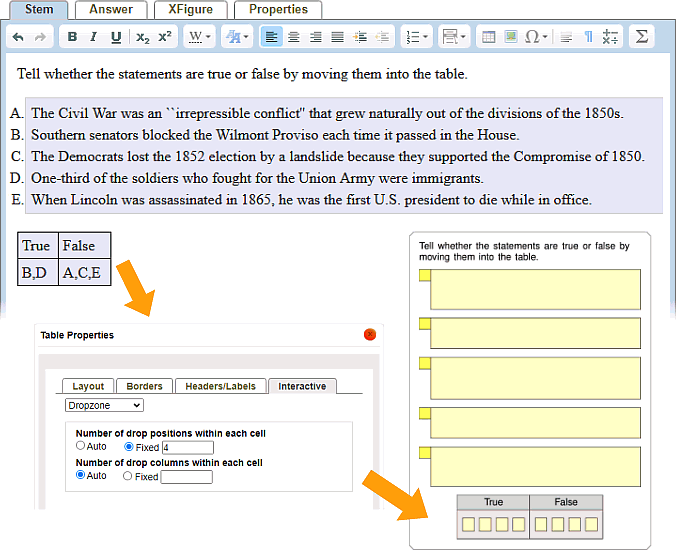
The following figure shows a dropzone table where the number of drop positions (represented by yellow squares) is set to 4. Remember, these are positions where an item can be dropped. Students won’t use all of the positions, and the only clue they’re given is that all five items can’t all be dropped into the same cell.
Very important:
-
The number of drop positions affects only those cells which are empty or which contain an answer string, i.e., a sequence of one or more letters. Drop positions do not affect a header row or column, or any cells which contain ordinary text.
-
There is an alternative method of increasing the number of drop positions, if you don’t want them all the same. You can type 0 (zero) in an answer string or in a cell that would otherwise be empty. For example, the string "B,C,0,0" tells Problem-Attic that B and C are the correct answer but it should include two extra drop positions in the cell.
Number of drop columns within each cell
When this option is set to Auto, Problem-Attic will arrange the drop positions based on table properties, such as the width of columns. If you specify the width for a particular column, then drop positions will wrap inside a cell. Otherwise, if you specify natural width, drop positions will be lined up horizontally in a cell.
It is mainly for table columns which are natural width that it’s helpful to set the number of drop columns in each cell. This forces breaks, so that the table columns don’t become too wide. The best value depends on how many drop positions you want, and also whether you’re including lettered tabs for the drag items.
Generally speaking, if you are not including lettered tabs, drop columns should be set to Auto or 1. If you are including lettered tabs, then you may want to choose a number that divides equally into the number of drop positions. Then you’ll get a nice-looking array, such as 3×2. Keep in mind that drop columns is for each cell, not the table as a whole.
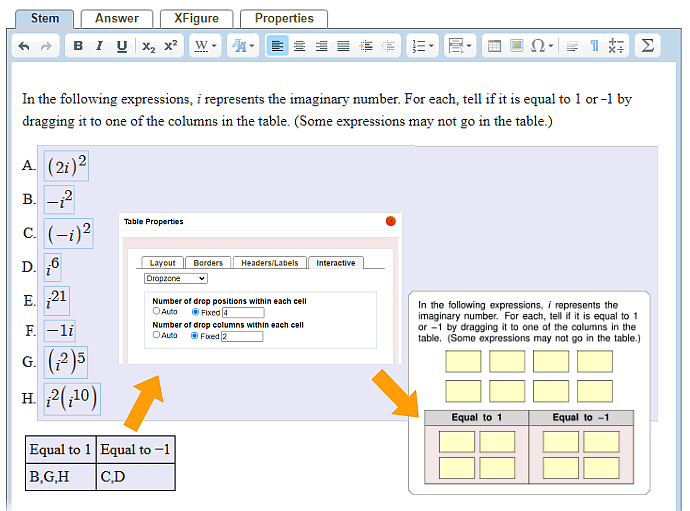
The following figure shows the effect of drop columns. The table columns are natural width, the number of drop positions (represented by yellow squares) is set to 4, and the number of drop columns is set to 2. As you can see, the items do not include lettered tabs, because they’re small enough to fit in the table.
Best practices
If you want drag-and-drop and other interactive questions to work well on a Problem-Attic online test, we recommend the following.
-
Include lettered tabs for draggable items unless they are very small, meaning a single word or short numeric expression. The lettered tabs help items fit in the limited screen space that is available for an online test.
-
If you turn off lettered tabs, it’s better if your dropzone table has more rows than columns. For example, if draggable items are long, and students are going to drop them into three cells, they will fit better if you create a table with three rows (instead of three columns). Problem-Attic will allow vertical scrolling, if necessary, but never horizontal scrolling.
-
If your dropzone table has labels or descriptions which identify the cells, go to Table Properties, click the Header/Labels tab, and tell Problem-Attic whether the header is the first row or first column. Then it can do a better job resizing the table cells, as needed.
-
As much as possible, let Problem-Attic handle the formatting of questions. Use the Answer types menu and list properties to communicate what you want, but avoid using spaces, paragraph alignment, or other techniques to move things around. Remember, Problem-Attic supports different page layouts and different kinds of output, so what you see in the editor will not exactly match what’s on a PDF, slideshow, or online test.
-
Respect the practical or other limits described above. The editor won’t stop you from trying to create mixed or nested lists, for example, but you won’t get an interactive or “live” question. Similarly, in the editor, a list can be very long, but Problem-Attic will enforce limits when it formats your question, such as a maximum of 8 items for a multiple-choice block, multi-select block, or dropdown menu.
-
If you need to override Problem-Attic’s formatting decisions, you can use the Advanced dialog that is available for tables and all types of lists. If you send an email to support@problem-attic.com and tell us what you’re trying to do, we’ll provide specific instructions.
All about answers
You may have questions about answers. Here are answers to your questions.
For all types of interactive questions, Problem-Attic derives the answer from what you type on the Stem tab in the editor. The Answer tab is for free-response or open-ended questions only. For an interactive question, you can type whatever you like on the Answer tab, but it will be treated as a comment; it won’t have any effect on automatic scoring.
Interactive questions will be scored automatically on a Problem-Attic online test if you do the following:
-
For multiple-choice and multi-select blocks, right-click on a choice and select “Mark correct answer” in the pop-up menu.
-
For Ordering items, right-click on the list, select Order Properties from the pop-up menu, and type the answer in the dialog box. The answer can be a sequence of letters (upper- or lowercase) or numbers separated by commas.
-
For a drag-and-drop question, type the answer (letters) in the dropzone table, in the respective cells where items are to be dragged. Use 0 (zero) for extra drop positions, or use the option to create a fixed number of them (Table Properties > Interactive tab).
-
For a dropdown menu, use an asterisk to mark the correct choice, or give the index (a number starting at one) in the Dropdown Properties dialog.
Last note: for drag-and-drop questions, Problem-Attic reports the answer with square brackets, which represent table cells. Each cell will be empty or contain an answer string. For example, assume you’ve created a table with 3 columns and 2 rows, and the first row is a header. In the second row you’ve typed "A,D" in the first cell and "B,C" in the third cell. On the teacher’s key, the answer will look like this: [A,D][][B,C]. A similar format is used for students’ answers, if you do manual scoring.