Managing a School Subscription
The person in charge of a school subscription is called the administrator. Don’t take the name too literally. The person can be a lead teacher, tech specialist, active user of Problem-Attic, or anyone who is based at the school or district office. The administrator’s job is easy and doesn’t require much time, usually just 5 or 10 minutes at the beginning, when setting up the account. The main responsibility is to add teachers, or to remove anyone who has left the school. To learn more about administrator responsibilities, see School Subscription Terms.
Note: an administrator can manage more than one school account. This is recommended for small districts. It’s made easier by the fact that a “deputy” can be appointed at each school to help. For a large number of schools, there can also be one district-level administrator. Please contact EducAide for more information about this option.
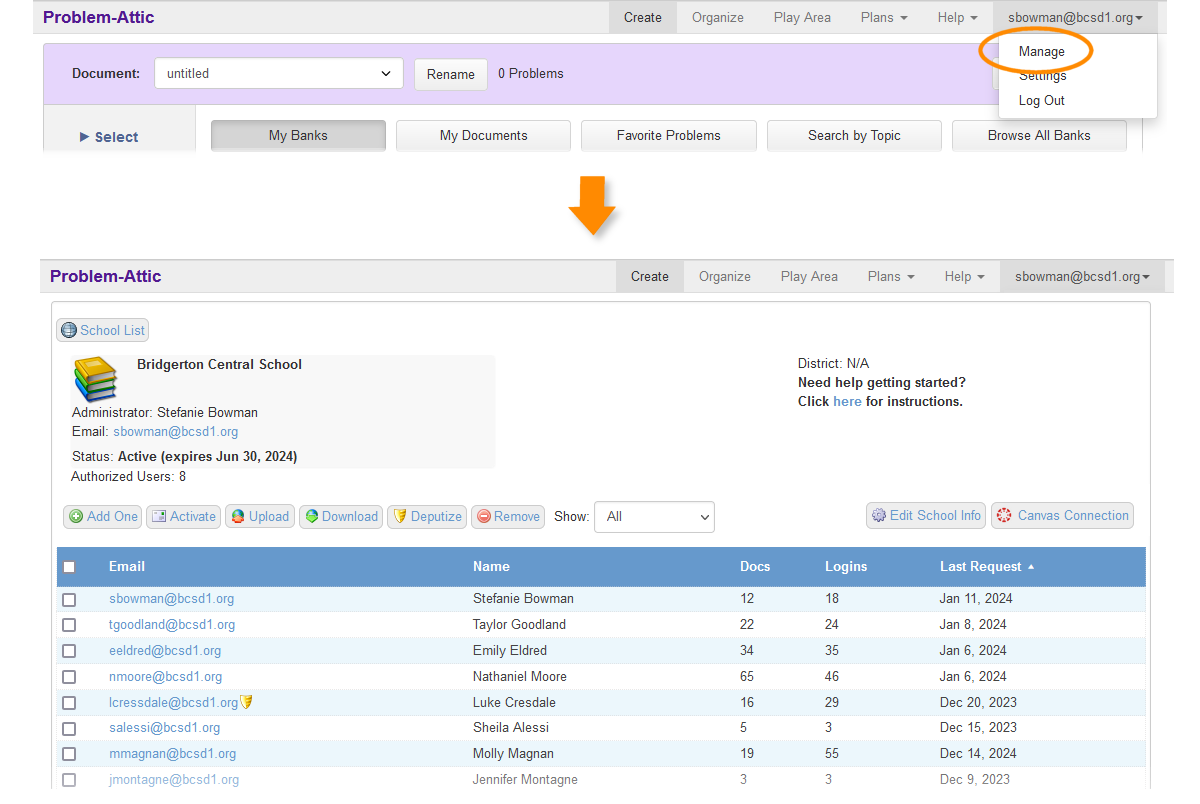
Each school with a Problem-Attic subscription has a management page. See example below. On the page is a list of teachers associated with the school. We refer to them as authorized users. Above the list are buttons for adding and removing teachers, appointing a deputy, sending activation emails, and editing certain information about the school. At first, only the administrator has access to the management page. If a deputy is appointed, then he or she has access to it, also.
To reach the management page, log in to Problem-Attic and click your user ID (email address) near the top-right of the screen. Then click Manage in the dropdown menu.
- If you are the administrator for a single school, you will now see the management page.
- If you are the administrator for multiple schools, you will see a list of them. Select one by clicking the info button (circled ‘i’) next to the school name.
As mentioned above, the administrator’s job is easy, because it mostly involves adding teachers to the school account. This is done entirely with email addresses. Teachers enter their first and last name and set a password when they first log in to Problem-Attic. On the management page, their email addresses can be added one at a time or by uploading a list. After teachers are added, there’s a quick second step, which is sending them an activation email.
Whenever we activate a school subscription, we send instructions to the administrator. Those instructions are available on the management page. Look for the tagline near the top-right, “Need help getting started?”
Details about the Management Page
At the top of the management page you’ll see the school name, administrator’s name and email address, and the expiration date of the subscription. (Normally a subscription expires on June 30th, at the end of the current school year.) If this information is not correct, please contact EducAide, as changes have to be made at our end. The administrator is responsible for the list of authorized users and other information on the page.
Here is information about the buttons.
-
Add One. Use this button to add one teacher to the list of authorized users. After clicking the button, type or paste the email address, then click the Submit button.
Notes about adding a teacher:
- If a teacher already has a free Problem-Attic account, and signed up for it with a school email address, then the teacher’s documents will get preserved when he or she added to a school account.
- If a teacher signed up with a personal address, then a second account will get created. In that case, the teacher should contact us. We’ll merge the two accounts and transfer over existing documents.
-
Activate. This button sends out an activation email. (Sometimes, to be friendlier, we call it a “welcome email”.) Notably, it is not sent automatically when a teacher is added to the list of authorized users. For reasons given below, it’s a separate step.
The email serves several purposes. First, it confirms that the teacher is part of a school subscription. Second, it includes the name and address of the administrator and a little background information about the program. Third and most importantly, if a user does not already have a free (personal) account in Problem-Attic, it includes an activation link. The user needs to click that link to get started. It will ask the user to enter a first and last name, set a password, and accept the Terms of Service.
Ordinarily, anyone who is added to the list of authorized users should be sent an activation email. This is done by putting a checkmark next to one or more email addresses and then clicking the Activate button. It does no harm to send the email more than once, and the administrator (or deputy) can test the feature by checking his or her own address. However, we recommend that teachers be notified in advance about the subscription, before they are sent an activation email. This not only gives them a heads-up about the program, but helps keep the system-generated emails from going into a spam folder.
-
Upload. Use this button to authorize many users at once. First, you will need to create a plain text file with teacher’s email addresses, one per line. Do not include angle brackets or any other information, just their email addresses. Give the file whatever name you like and save it in a convenient location. Then click the the Upload button in Problem-Attic. After you navigate to the file and open it, Problem-Attic will put a message at the top of the page showing how many users (teacher licenses) were created.
Notes about uploading a file:
- You can repeat the upload process for different groups of teachers. If you accidentally include the same name twice, that’s okay. Duplicate names are safely ignored by the program.
- Sometimes a teacher will already be associated with another school account, perhaps because the teacher has moved within a district. Contact EducAide in this situation and we’ll help move the teacher to the new school account.
-
The file must be plain text. A program
like Notepad (Windows) or TextEdit (Mac) is best for this
purpose. If you use a word processor or spreadsheet, be
sure to save the file without any formatting information or
hidden characters, and be sure to preserve line breaks.
Here’s an example:
nporter@psd31.net
pgonzalez@psd31.net
janthony@psd31.net
...
Important: the School Subscription Terms contain rules about who can be an authorized user. If you need clarification about certain job titles, like a teacher aide, please contact us. Generally, district administrators are not allowed to be added to a school account unless all schools in the district (at the same level) have a subscription.
-
Download. Click this button to get a CSV file with information about authorized users: ID (email address), first and last name, number of documents and logins, and last login date.
-
Deputize. One authorized user at a school can help manage the subscription. To appoint the user, put a checkmark next to the email address and click the Deputize button. To revoke the appointment, do this a second time. (When you put a checkmark next to the current deputy, the button will show a red slash, signaling a removal.)
-
Remove. To remove one or more users, put a checkmark next to their email addresses, then click the Remove button.
Note: any user who is deleted from a school account will still have a free (personal) account in Problem-Attic. The user can log in with the same ID and password and see all previously-created documents. But the user will no longer have access to for-pay content or other subscription options.
-
Edit School Info. Click this button to change certain account information, such as the school’s time zone, tagline, and description. The tagline is typically a motto, like “Respect, Responsibility, Resourcefulness”. The description can be used to pass along information about your school, news about your Problem-Attic subscription, or ways of getting help. Problem-Attic uses the tagline and description in different places, depending on available space.
You will also notice the dropdown menu called “Show”. You can use this as a filter to show all, activated, or non-activated users. The option is particularly handy when used with the checkbox in the blue bar, which lets you select all users who are shown in the list.
Another convenience: the columns are sortable. If you click a title in the blue bar, or double-click, you can sort a column in descending or ascending order. This allows you, for example, to put all non-activated users at the top. Just double-click “Last Request”, which essentially means the use of the program.
Please note that a school with a Problem-Attic subscription can have up to 60 authorized users. This is somewhat arbitrary; it’s mainly to keep the number from being unlimited. Most schools, in fact, use only a small portion of the available slots. If your school is very large, and you need more, let us know and we’ll increase the number.
If you have questions about management or need assistance setting up an account, please contact us by phone or email.
The Problem-Attic Team at EducAide Software
Phone: 800-669-9405 toll-free / 707-554-6505 local
(phone hours are 8:30 am to 5:30 pm Pacific time)
Email: support@problem-attic.com